Managing Users and Credentials
Account Types
See all articlesUnderstanding Native Accounts vs SSO Access
Introduction
Effective user management is crucial for maintaining the security and efficiency of your ReadyWorks environment. This guide provides comprehensive instructions for administrators on how to manage users within ReadyWorks, covering both native user accounts and Single Sign-On (SSO) integration using LDAP.
Key Topics:
- Understanding Native User Accounts vs. SSO Accounts
- Adding and Managing Native User Accounts
- Assigning Roles and Permissions
- Setting Up Single Sign-On (SSO) with LDAP
-
Managing Users via Security Groups
Understanding Native User Accounts vs. SSO Accounts
Native User Accounts
- Definition: Users created and managed directly within the ReadyWorks platform.
- Authentication: Users log in using credentials (username and password) stored in ReadyWorks.
- Use Cases: Suitable for small environments or when SSO is not implemented.
Single Sign-On (SSO) Accounts
- Definition: Users authenticate through an external Identity Provider (IdP) using protocols like LDAP.
- Authentication: Users log in using their enterprise credentials managed by the IdP.
- Use Cases: Ideal for organizations seeking centralized authentication, enhanced security, and streamlined user management.
ReadyWorks 'Native' User Accounts
See all articlesNative User Accounts
The User Accounts tab provides the ability to manage ReadyWorks user accounts.
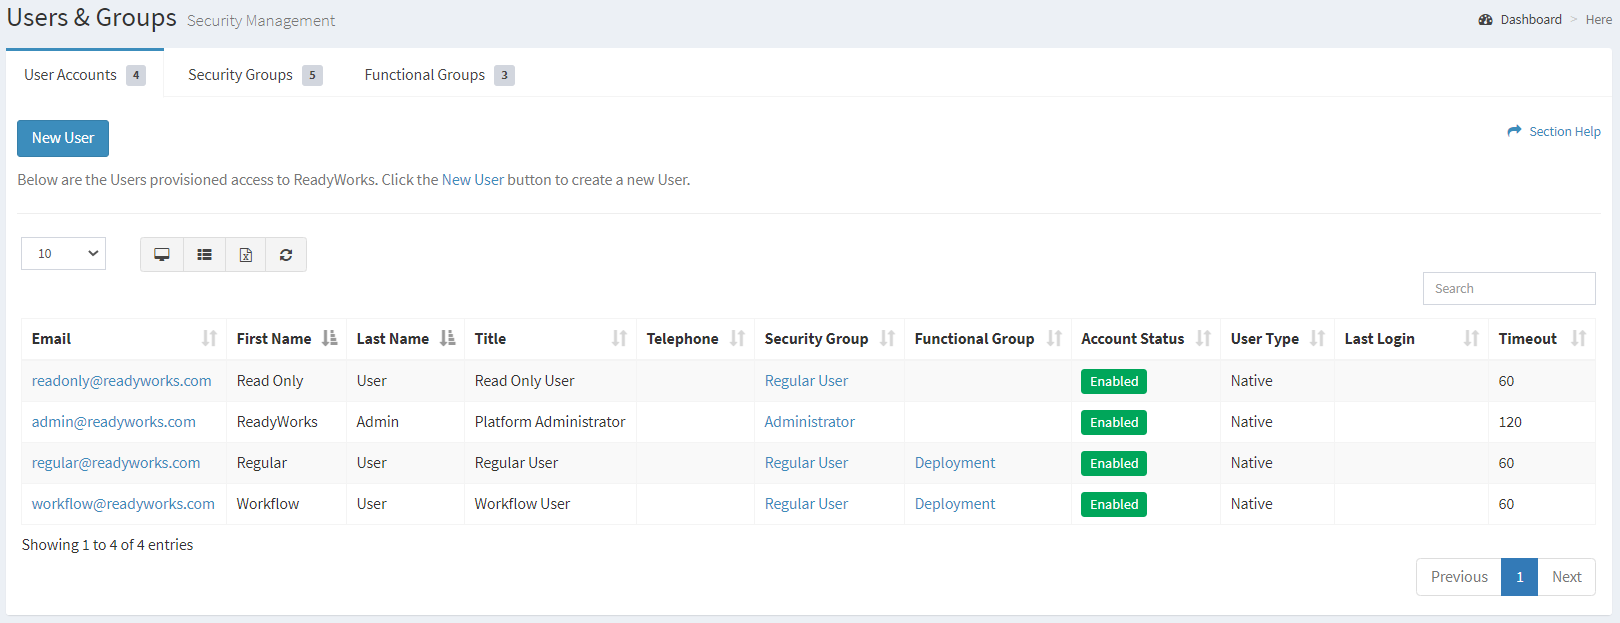
Available operations:
- Create new user accounts by clicking on the New User button
- View a list of ReadyWorks user accounts
- Columns available
- Email – Email address of the ReadyWorks user account (ReadyWorks login ID)
- First Name – First name of the user
- Last Name – Last name of the user
- Title – Title of the user
- Telephone – Telephone number of the user
- Security Group – Security group of the user (Administrator, Regular User, Regular User (No Delete), Read Only User, Workflow User, Custom Security Group)
- Functional Group – Functional group the user is assigned to
- Account Status – Whether the account is enabled or disabled
- User Type – Type of the user account (Native or SSO)
- Last Login – Date and time of the last login activity of the user
- Timeout – Amount of inactivity time (in minutes) before the user is logged out
- Columns available
- View the properties of user accounts by clicking the hyperlink of the Email field
- Delete user accounts by selecting a user account (row) and clicking the Delete User button on the toolbar
- You can also change the number of visible rows in the table, view full screen, set column visibility, export to CSV or Excel, refresh the table and search for text
Viewing User Accounts
The View User page provides the ability to view the properties of a user account and is accessed by clicking the hyperlink of the user account Email field. Administrators can view any user account. ReadyWorks users can only view their own user profile. The page can be accessed from the User Accounts tab or from a user viewing their own profile.
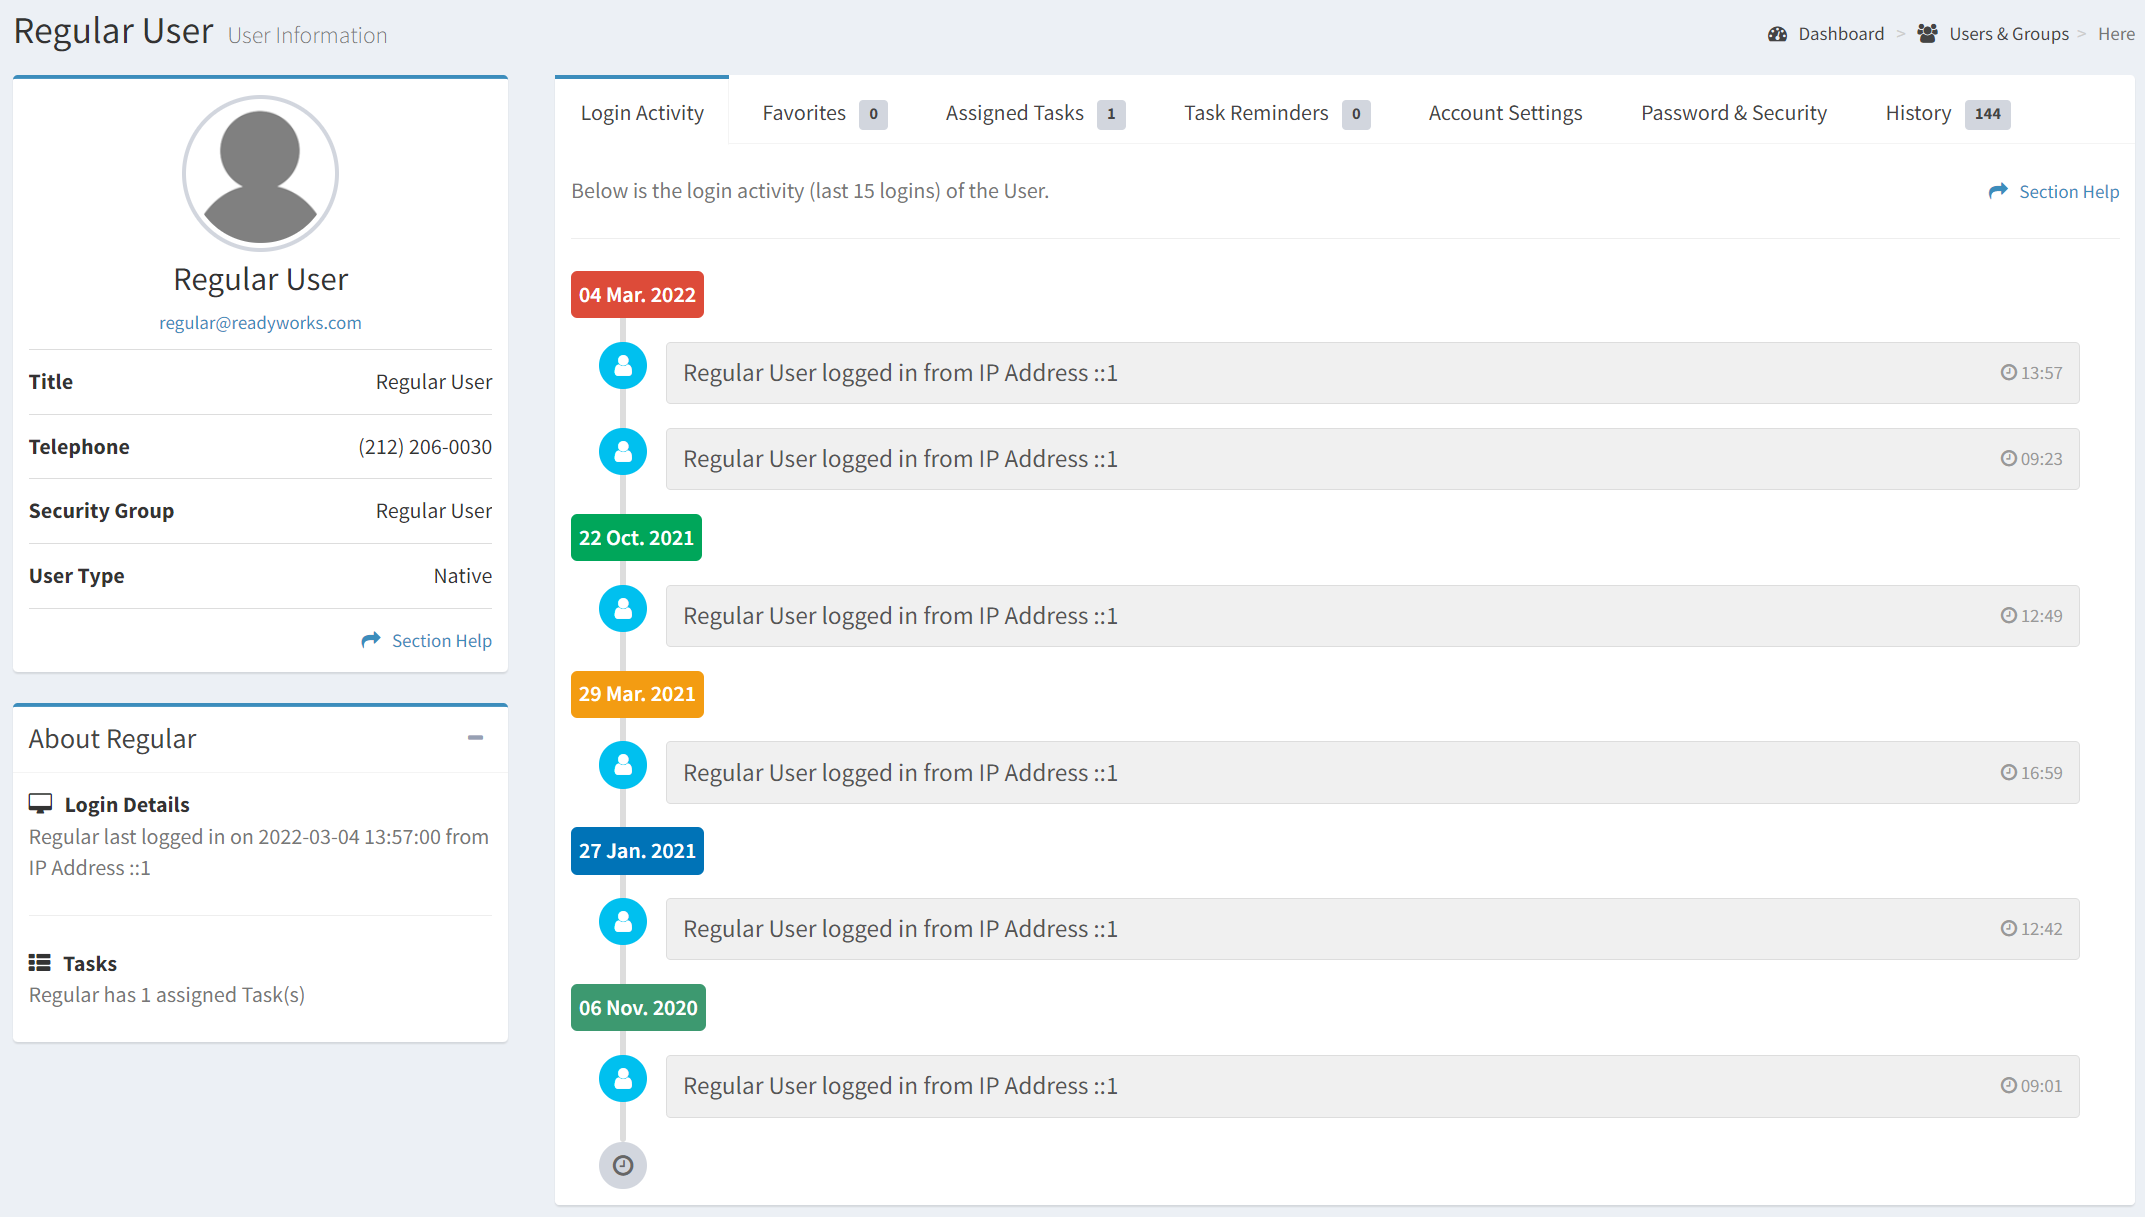
Available operations:
- View the profile of the user
- View login activity of the user
- View and manage favorites created by the user
- View tasks assigned to the user
- View and manage task reminders created by the user
- View and update the accounts settings of the user account
- View and update the password and security settings of the user account
- View the history of the user
Single Sign-On
See all articlesConfiguring and Using Single Sign-On
Single Sign-On (SSO) is a popular authentication method that enables users to access multiple applications with a single set of login credentials.
- SSO has become an essential feature for enhancing user experience and security in cloud-based software applications.
- Our company has developed a new module that enables administrators to set up ReadyWorks DPC with SSO.
- The SSO Configuration Card provides access to enable ReadyWorks to accept authentication of users through your provider and configure that experience.
Purpose of the feature
- Streamlining the authentication process for ReadyWorks users, simplifies access to ReadyWorks by minimizing the need for multiple logins and credentials.
- Enhance security through centralized authentication by complying with security policies and industry standards.
- Improving the ReadyWorks user experience with SSO capabilities, for quicker and more convenient access to ReadyWorks.
- Improving the ReadyWorks administrative experience by minimizing the time spent on user management, allowing administrators to focus on core tasks.
- Streamlining integration with popular SSO Identity Providers with a No Code interface ReadyWorks Administrators can use with a little help from their own SSO SME.
Overview of functionality
- Administrators can easily enable and configure SSO authentication through your identity provider within ReadyWorks DPC, easily and quickly.
- Upon successful configuration, users can access ReadyWorks DPC with a single set of login credentials managed by their identity provider, streamlining the authentication process, and enhancing user experience.
We will provide an overview of the SSO Configuration Cards and using its functionality. We will discuss the design, features, usage, deployment options, and value to the administrator. We will also provide guidelines on how to use the feature effectively and troubleshoot any issues that may arise. By the end of this document, you will have a comprehensive understanding of how to use the SSO module to configure ReadyWorks DPC with SSO authentication and improve the overall user experience for your organization.
Features
Inputs and outputs
Inputs:
- Enable / Disable the Identity Provider: Through the User of the Enable/Disable switch an Administrator can either Enable or Disable authentication of ReadyWorks Users through the SSO Identity Provider.
- When Enabled, The Administrator can then configure the settings necessary to successfully authenticate ReadyWorks Users through SSO Identity Provider by clicking the Settings link.
Outputs:
- User authentication: this module outputs the result of user authentication to ReadyWorks, allowing the user to access the appropriate resources based on their assigned Security Group.
- Error messages: this module will output error messages in the event of successful or failed authentication related to the SSO login attempt by a ReadyWorks User.
The Event Log can be utilized for Audit Compliance Review regarding Security and other events.
Benefits and Scenarios for Use
Benefits:
- User Access Management: Streamline user access management by allowing administrators to centrally manage user authentication and access control.
- Improved User Experience: Improve the user experience by including ReadyWorks in the single sign on infrastructure supported by the organization reducing the need for user management within ReadyWorks.
- Security and Compliance: Improve security and compliance by enforcing stronger authentication measures and enabling audit logging of user activity.
- Integration with Corporate Identity Provider: Integrate with SSO Identity Providers, allowing users to authenticate using their existing credentials.
Scenarios for Use:
- Onboarding New Users: New Users are onboarded quickly, simply by adhering to the SSO Identity Provider’s authentication process. ReadyWorks negotiates with the SSO Identity Provider, verifies the user’s identity, and authenticates them to access ReadyWorks enabling them to utilize their pre-negotiated features successfully.
- Onboarding New Teams: If a New SSO Identity Provider authentication group is desired, simply use the appropriate SSO Configuration Card, Edit the Settings and add that new group and provision them accordingly.
Security and privacy considerations
User Authentication:
- This Feature provides secure authentication for ReadyWorks DPC by allowing administrators to enable SSO authentication.
- This Feature ensures that the user's identity is authenticated before granting access to the system, which enhances security.
User Authorization:
- This Feature also ensures that users are authorized before being granted access to specific resources within the system.
- Access control mechanisms are implemented to ensure that only authorized users can access sensitive data or perform critical functions within the system.
Data Privacy:
- This Module is designed with data privacy in mind.
- User data is protected from unauthorized access, and all sensitive data is encrypted to prevent unauthorized disclosure.
- Additionally, the module adheres to data protection laws and regulations, such as the GDPR and CCPA, to ensure that user privacy is respected.
Audit Trail:
- The SSO Module also provides an audit trail that tracks user activity within the system.
The Event Log records user logins, logout times, and any actions performed within the system. This information can be used to investigate security incidents or identify suspicious behavior.
Compliance:
- The SSO Module is compliant with SAML industry standards.
- The module also adheres to security best practices and guidelines, such as OWASP, to ensure that security vulnerabilities are identified and addressed promptly.
Enable a New SSO Identity Provider
- Make sure you are logged in as a RW Administrator
-
Make sure you have your SSO SME or the information necessary to configure the appropriate SSO Identity Provider card. You will need:
-
Validating Information: You should know the following so that you can confirm that the information you have received is correct.
- LDAP SERVER NAME: In general, the LDAP server name is the fully qualified domain name (FQDN) or IP address of the LDAP server that is used for authentication and authorization in the LDAP SSO process.
- PORT NUMBER: In general, the port number used for LDAP SSO is either 389 (for LDAP over TCP) or 636 (for LDAP over SSL).
- USE SSL/TLS (Checkbox): SSL/TLS is used to provide secure communication between the Identity Provider (IdP) and the Service Provider (SP) during the authentication process.
- UserName and Password: When ReadyWorks attempts to access an LDAP server, it must provide a valid username and password to be authenticated and granted access to the directory.
- User OU (DN): This allows the application to search the specified User OU for user accounts, and to retrieve information about the users, such as group membership, access permissions, and other attributes.
-
Validating Information: You should know the following so that you can confirm that the information you have received is correct.
NOTE: Enabling a NEW SSO Identity Provider will automatically Disable an Existing Enabled Provider. Only one SSO Identity Provider can be configured to work with RW at any given time.
- Start by clicking on Configuration> Module Settings > Single Sign-On
- From there find the Configuration Card you would like to Enable, in this example we'll use the LDAP Identity Provider card.
- By Clicking the Switch on that Identity Provider’s Configuration Card. When Enabled the Enable/Disable Indicator will show , and the Switch will be green.
- Click on the Settings link to view, configure or edit the LDAP SSO Provider’s Connection Settings and Group Mappings.
Edit an Existing LDAP SSO Identity Provider
- Make sure you are logged in as a RW Administrator
- Make sure you have your SSO SME or the information necessary to configure the LDAP SSO Identity Provider. You will need:
-
Validating Information: You should know the following so that you can confirm that the information you have received is correct.
- SERVER NAME: In general, the server name is the fully qualified domain name (FQDN) or IP address of the identity provider server that is used for authentication and authorization in the SSO process.
- PORT NUMBER: In general, the port number used to connect with the SSO identity provider. Obtain the proper ports from your SSO Adminitrator.
- USE SSL/TLS (Checkbox): SSL/TLS is used to provide secure communication between the Identity Provider (IdP) and the Service Provider (SP) during the authentication process.
- UserName and Password: When ReadyWorks attempts to access an LDAP server, it must provide a valid username and password to be authenticated and granted access to the directory.
- User OU (DN): This allows the application to search the specified User OU for user accounts, and to retrieve information about the users, such as group membership, access permissions, and other attributes.
- Start by clicking on Configuration> Module Settings > Single Sign-On
- From there locate the appropriate Configuration Card, again in this example we'll be using LDAP.
- Click on the Settings link to view, configure or edit the LDAP SSO Provider’s Connection Settings and Group Mappings.
NOTE: The Identity Provider must be enabled for you to be able to edit it. If it is Disabled, you will see the Enable/Disable Indicator show and the Switch will be red. To Enable the LDAP SSO Identity Provider follow the Enable a New LDAP SSO Identity Provider use case above.
Disable a LDAP SSO Identity Provider
- Make sure you are logged in as a RW Administrator
NOTE: Disabling an SSO Identity Provider will discontinue SSO Services from that Provider for the purpose of logging into RW. Make sure that the RW Native Configuration Card is Enabled before you Disable the SSO Identity Provider or users will not be able to log into ReadyWorks.
- Start by clicking on Configuration> Module Settings > Single Sign-On
- From there locate the appropriate Configuration Card.
NOTE: The Identity Provider must be enabled for you to be able to disable it. If it is Enabled, you will see the Enable/Disable Indicator show and the Switch will be green.
- To Disable the LDAP SSO Identity Provider, click on the Switch and it will then turn red , and the Enable/Disable Indicator will show as disabled.
NOTE: Disabling an SSO Identity Provider will discontinue SSO Services from that Provider for the purpose of logging into RW. Make sure that the RW Native Configuration Card is Enabled before you Disable the SSO Identity Provider or users will not be able to log into ReadyWorks.
Best practices for using Single Sign-On
Basic Knowledge
This feature requires a detailed understanding of your SSO Infrastructure, and an understanding of the configuration of authentication through your specific SSO Identity Provider. Check with your SSO Support Team or SME. They can lend a hand in gaining the specific details necessary (like SSO Identity Provider Server Name, etc.) Make sure to have that information or individual who can help at the ready before working with this module.
Cautions
- Enabling an SSO Identity Provider within RW, you will Disable any previously enabled Provider. Be sure you want to proceed before doing so. RW only works with one SSO Identity Provider enabled at a time.
- When disabling the LDAP SSO Identity Provider in ReadyWorks, be sure the RW Native Configuration Card is Enabled.
Preventative Measures
If SSO is enabled, your ReadyWorks Installation will be dependent on your SSO Identity Provider’s infrastructure. Changes to that infrastructure, or issues experienced by that infrastructure may cause your RW Users to be unable to Log In. Be sure to be subscribed to your SSO Identity Provider’s Change Control Communications so that you may be alerted to any Change or Issue before it disables your users.
Troubleshooting and FAQ
Symptom: Users are unable to log into RW through Single Sign On.
Check the following;
- Is the SSO Module Enabled? Check Configuration > Options > Modules > SSO Module. It should be enabled, if not, enable it.
- Is the SSO Identity Provider Configuration Card Enabled? If not enable it. Follow the instructions for this module, and the specific Feature Function Document for the SSO Identity Provider to enable it.
-
Check that the SSO Identity Provider’s Configuration Card’s Connection Settings are as they should be.
- Check with your SSO support Team to see if there have been any changes to the SSO Infrastructure. If there have, you may have to change the Connection Settings.
-
Check that the SSO Identity Provider’s Configuration Card’s Group Mappings are as they should be.
- Check with your SSO support Team to see if there have been any changes to the SSO Infrastructure (Specifically Active Directory). If so, changes to your Group Mappings may be necessary.
NOTE: In the event of a Protracted Failure, you can always Enable RW Native Login as a backup to any sort of SSO authentication Failure. Each user that has their own Native RW User Account can access the system.
FAQ: Single Sign-On - Frequently Asked Questions
When deploying SSO in ReadyWorks, consider the following security considerations:
- HTTPS Requirement: SSO integration requires HTTPS to be enabled. Most identity providers will not accept traffic from non-HTTPS sources.
- Federation Metadata: Obtain the Federation metadata XML file from your identity provider (IDP). This file contains crucial information for establishing the SSO connection.
- Group Mappings: Carefully configure group mappings between your IDP and ReadyWorks security groups. This ensures users are assigned the correct permissions when they log in via SSO.
- Least Privilege: Use the most restrictive security model. If a user belongs to multiple groups, the most restrictive permissions will take precedence.
- Regular Review: Periodically review and update group mappings, especially when new security groups are created in ReadyWorks.
- SSO Provider Selection: Choose a compatible SSO provider. ReadyWorks supports various providers like Okta, Azure AD, and generic SAML connections.
- User Account Management: Understand that SSO creates underlying user accounts in ReadyWorks. These accounts are flagged as SSO users and don't store passwords locally.
- Session Timeout: Configure appropriate session timeout settings to balance security and user experience.
- Functional Groups: Use functional groups for workflow assignments without affecting security permissions.
- SSL Certificates: Ensure proper SSL certificate management for the ReadyWorks server to maintain a secure SSO connection.
- IDP Configuration: Work closely with your IDP team to ensure correct configuration on their end, including proper role-based provisioning.
Remember, your SSO implementation within ReadyWorks should be thoroughly tested in a non-production environment before deploying to production to ensure all security measures are working as expected. Understand that configurations for test environments will change once moving to a production SSO implementation.
SSL Certificates
See all articlesProcedure to Replace SSL Certificates in ReadyWorks
When replacing the SSL certificate used by the ReadyWorks Server (RWS), it’s critical to follow a structured process to maintain service availability and secure connections. If you have the .crt (certificate) and .key (private key) files from your Certificate Authority (CA), you can proceed with the following steps.
✅ Pre-Requisites
- Ensure the .crt and .key files are valid and correctly signed by a trusted CA.
- Backup the current certificates before proceeding.
Step-by-Step Instructions
Locate the Current Certificate Files
- On your ReadyWorks host server, navigate to the certs directory, typically located at:
c:\readyworks/certs
- Identify the current certificate and key file names (commonly named server.crt and server.key, but this may vary based on your configuration).
Backup Existing Files
- Before making any changes, copy the existing .crt and .key file into a secure and easy to remember backup folder/location.
Deploy New Certificates
- Copy the new .crt and .key files into the certs directory
- Rename the new files to match the current filenames, replacing the original files
Restart the ReadyWorks Service
- Apply the changes by restarting the ReadyWorks service
- Open the ReadyWorks server and click restart next to apache
✅ Post-Replacement Checklist
- Access the ReadyWorks portal via HTTPS and confirm that the new certificate is presented.
- Check the certificate details (issuer, expiration, etc.) in the browser to ensure correctness.
- Optionally, use tools like openssl s_client or curl -v to validate the certificate at the command line.
📌 Additional Recommendations
- Schedule certificate replacements during maintenance windows to minimize service impact.
- Set calendar reminders or monitoring alerts for upcoming certificate expirations.
- Maintain a version history of all deployed certificates for auditing purposes.